Step 1
To start the installation, go to your FTP area and download the latest version of Replicator.
...
By default, the application gets installed on your system drive in the Program Files folder. The typical path is C:\Program Files. To select a different destination folder, click Browse… and indicate the path.
...
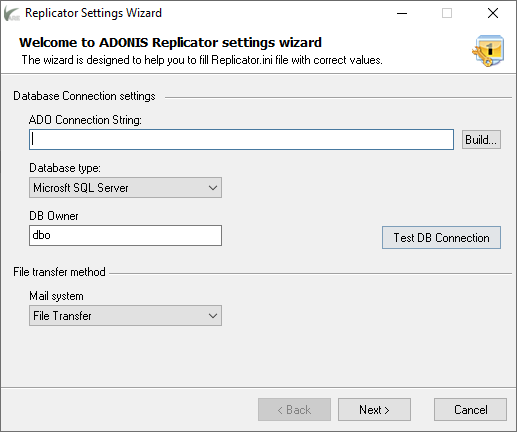
In the Welcome to the ADONIS Replicator settings wizard, set the database connection settings:
...
Database type. Select Microsoft SQL Server.
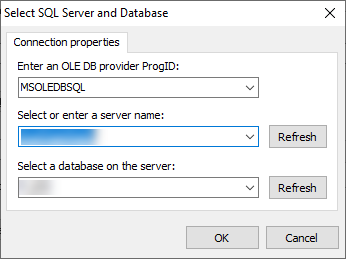
SQL Server Name. From the drop-down list, select the server name.
Database name. From the drop-down list, select the database name.
OLE DB Provider. Select Microsoft OLE DB Provider for SQL Server), a server name, and a database name. Click OK to view the connection string constructed based on the provided connection properties:
On completing, click Test DB Connection. In case the connection is successful, the message appears on the screen: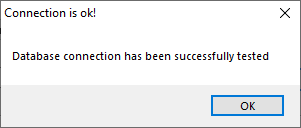
Database type. Select Microsoft SQL Server
Current Site Number. Enter a site number or click Read Current Site Number from DB to fetch the site number.
DB Owner. Specify a database owner.
Mail system. From the drop-down list, select the mail system you would like to use: File Transfer, MAPI, SMTP and POP3, FTP, SFTP.
On completing, click Test DB Connection. In case the connection is successful, the message appears on the screen:
...
When done, click Next to proceed with the installation steps.
| Tip |
|---|
The next installation step varies depending on the file transfer method. Clicking the link associated with the selected mail system will redirect you to the respective instructions: |
Step 6
At this stage, the directions vary based on the mail system selected at Step 5. Please follow the directions concerning the selection you have made.
...
Server Name. Enter ftp.adonis.no or the address of your FTP server.
Port. Enter 21 as it is the default port for sending commands.
User Name. Enter your username.
Password. Enter your password.
Use SSL. Select the checkbox if you want to create an encrypted channel for data transmission.
Passive Mode. Select the checkbox if you want to make FTP run in passive mode.
Resume transfer if connection breaks. Select the checkbox if you want the Replicator to resume an interrupted file downloading/uploading from the point of interruption.
Write FTP Commands to the log file. Select the checkbox if you want to record the events of Replicator in log files.
Send Directory. Indicate the directory to which files will be sent.
You can specify the sent directory as ...replicator/site#DSN#. It will automatically set the directory to the folder for this site (#DSN# will be replaced with the destination site number).
If the sent directory starts with a slash symbol (/), Replicator interprets the string as an absolute path to the FTP server. Otherwise, Replicator interprets it as a relative path.You can set ...replicator/site10 or ...replicator/site#CSN#.
Receive Directory. Specify the directory from which files will be imported.
The receive directory is always interpreted as an absolute path to the FTP server.
...
Server Name. Enter the address of your SFTP server.
Port. Enter 22 as it is the default port for sending commands.
User Name. Enter your username.
Password. Enter your password.
Resume transfer if connection breaks. Select the checkbox if you want Replicator to resume an interrupted file downloading/uploading from the point of interruption.
Write SFTP Commands to the log file. Select the checkbox if you want to record the events of The replicator in log files.
Send Directory. Indicate the directory to which files will be sent.
You can specify the sent directory as ...replicator/site#DSN#. It will automatically set the directory to the folder for this site (#DSN# will be replaced with the destination site number).
If the sent directory starts with a slash symbol (/), Replicator interprets the string as an absolute path to the FTP server. Otherwise, Replicator interprets it as a relative path.
You can set ...replicator/site10 or ...replicator/site#CSN#.
Receive Directory. Specify the directory from which files will be imported.
The receive directory is always interpreted as an absolute path to the FTP server.
...
Current Site Number. Set a numeric value that determines the site where the Replicator is installed. For this purpose, it is recommended to click the Read Current Site Number from the DB button instead of entering a numeric value manually.
Data Directory. Indicate a folder where export and import folders, as well as CAB files, will be stored. To do this, click the Browse button and select the directory.
If the Data Directory field is empty, Export and import data are then placed directly to the application folder.
...
Stop Export On Error to stop the export process in case an error occurs.
Disable splitting data by priority to ignore priority levels of data.
Specify the import settings by selecting the options:
Stop Import On Error to stop the import process in case an error occurs.
Write Ignored Errors to the Error Log file (as Warnings) to store errors being ignored to log files.
Resolve foreign key violations automatically to fix the foreign key constraint violations automatically.
Besides, you can list the DB errors (from SQL) that Replicator will ignore when executing the tasks. To do this, simply enter the errors separated by semicolons to the DB errors to be ignored field.
When you are done, click Next to continue.
Step 8
Specify the file format for exporting/importing data, as well as set the encryption and cleanup settings:
...
Microsoft CAB Archive. Select the option to export the data file as an archive.
Adonis Replicator Data file (*.rpl). To export encrypted data, select the Adonis Replicator Data file (*.rpl) option > the Encrypt data with AES algorithm checkbox.
Within the Import File Format section, you can forbid accepting non-encrypted files on import. For this, select the Do not accept non-encrypted files on the Import checkbox. By default, Replicator accepts non-encrypted files on import.
Within the Encryption Settings section, enter the password required to encrypt and dis-encrypt RPL files.
Within the Cleanup Settings section, you can configure the setting allowing you to remove old files automatically. To do this, select the Remove old files from archive folders checkbox and set the frequency (in days) the clean-up is to be performed.
On completing, click Next.
Step 9
Configure the connection details required to enable the Replicator Manager to communicate with the replicator service.
...
In the Protocols section, select one of the options:
Enable Named Pipe. Select the option to get connected to a service running on the same computer as Replicator Manager.
Allow remote connections via TCP/IP. Set the checkbox and select the port required for the Replicator Manager to connect to the replicator service remotely.
...
Server Name. Enter the server name to which to connect.
Port. Specify the port number for communication between mail servers.
The server requires authentication. Select the checkbox if a connection to the server requires authentication.
Use SSL. Select the option to create an encrypted transmission channel.
User Name. Enter a username.
Password. Enter a password.
Sender Email. Enter the sender's email address.
Receiver email list. Enter the email address(es) to which the data is to be sent. To do this, click the Add email button and type an email address. To remove an email address from the list, click Delete email.
Send reports on errors. Select the checkbox to send error reports.
Send Status Reports. Select the checkbox to send status reports. On selecting, set the interval for sending reports.
Send warnings if no cab/rpl files have been received recently. Select the checkbox to send warnings. On selecting, define the interval at which Replicator checks whether no files have been received.
When done, click Next to proceed with the installation steps.
Step 11
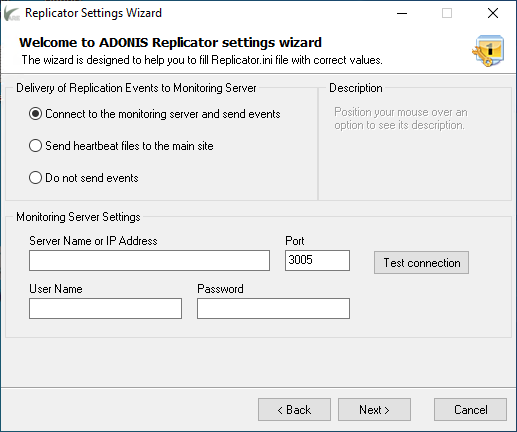
Configure the settings to deliver the Replicator events to the monitoring Monitoring server.
...
Connect to the monitoring server and send events. The option is recommended to be selected if your satellite or the main site has a stable internet connection. On selecting the option, you are required to set the monitoring server connection settings: server name or IP address, port, username and password. Besides, specify the way you want to establish connection with the server:
Server’s native binary protocol
WebSocket protocol
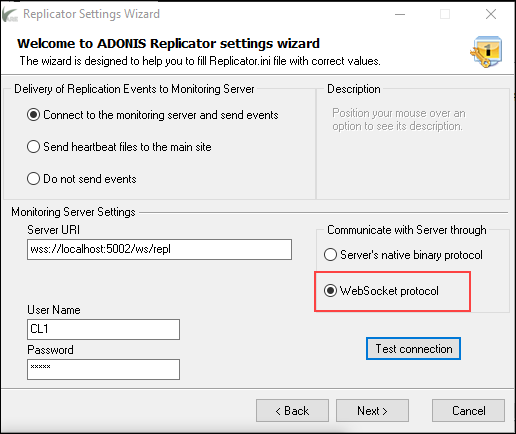
After configuring the monitoring server settings, click Test Connection to make sure the connection is successfully established.
Send heartbeat files to the main site. Set the option if you configure a satellite that has a poor internet connection.
Do not send events. Select the option to forbid monitoring the current site. If the option is selected on the main site, it also covers the sites sending their replication events to the server via the main site.
On completing, click Next. Finish.
Step 12
The installation is completed.
...
Before getting started with the update process, make sure the Adonis Replicator instance involved in the update process is ready. The following procedures are to be performed: disable a scheduler and stop the replicator service.
To disable a scheduler:
On the left-hand side pane of Replicator Manager, click Scheduler.
In the Schedule of Adonis Replication working space, clear the Use built-in scheduler checkbox:
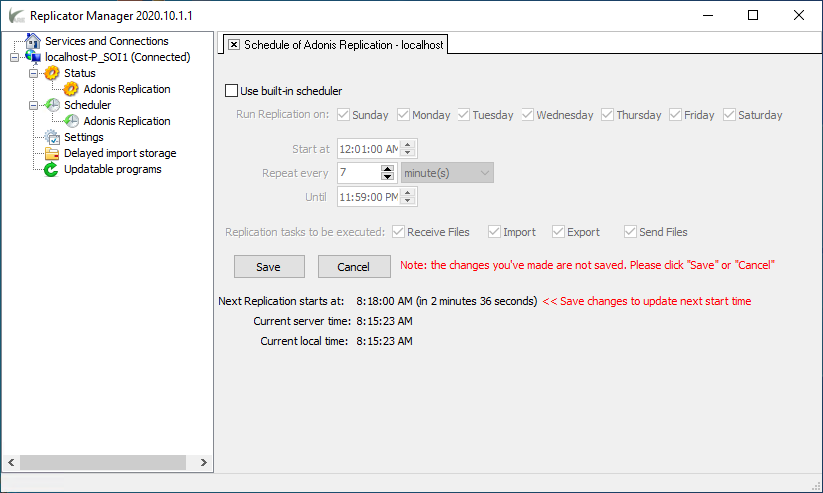
Click Save to proceed.
To stop the replicator service:
On the left-hand side pane of Replicator Manager, click Services and Connections.
When the General working space appears, select the instance you want to update and click the Stop Service button. The service status then changes to Stopped:
Now, follow the steps below for the actual update:
...
Current Site Number. Verify the numeric value which determines the site where Adonis Replicator is installed. If it is not correct, click the Read Current Site Number from the DB button instead of entering a numeric value manually.
Data Directory. Verify the folder where export and import folders and CAB files are to be stored. If you want to change the directory, click the Browse button and select a different directory.
In case the Data Directory field is empty. Export and import data are then placed directly in the application folder.
...
Stop Export On Error to stop the export process in case an error occurs.
Disable splitting data by priority to ignore priority levels of data.
Verify the import settings and modify them according to your preferences:
Stop Import On Error to stop the import process in case an error occurs.
Write Ignored Errors to an Error Log file (as Warnings) to store errors being ignored to log files.
Resolve foreign key violations automatically. To automatically fix the foreign key constraint violations.
Besides, you can list the DB errors (from SQL) that. Adonis Replicator will ignore when running. To do this, simply enter the errors separated by semicolons to the DB errors to be ignored field.
When you are done, click. Next to continue.
Step 8
Verify the file format for exporting/importing data, and set the encryption and cleanup settings. You can modify the settings based on your needs.
...
Microsoft CAB Archive. Select the option to export the data file as an archive.
Adonis Replicator Data file (*.rpl). To export encrypted data, select the Adonis Replicator Data file (*.rpl) option > the Encrypt data with AES algorithm checkbox.
In the Import File Format section, you can forbid accepting non-encrypted files on import. For this, select the Do not accept non-encrypted files on Import. Checkbox. By default, Replicator accepts non-encrypted files on import.
In the Encryption Settings section, enter the password required to encrypt and dis-encrypt RPL files.
In the Cleanup Settings section, you can configure the setting allowing you to remove old files automatically. To do this, select the Remove old files from archive folders. Checkbox and set the frequency (in days) the clean-up is to be performed.
On completing, click. Next.
Step 9
Verify the connection details required to enable Replicator Manager to communicate with the replicator service:
...
Click Next to continue.
Step 10
...
Server Name. Enter a server name to which to connect.
Port. Specify the port number for communication between mail servers.
The server requires authentication. Select the checkbox if a connection to the server requires authentication.
Use SSL. Select the option to create an encrypted transmission channel.
User Name. Enter a username.
Password. Enter a password.
Sender Email. Enter the email address of a sender.
Receiver email list. Enter the email address(es) to which the data is to be sent. To do this, click the Add email button and type an email address. To remove an email address from the list, click. Delete email.
Send reports on errors. Select the checkbox to send error reports.
Send Status Reports. Select the checkbox to send status reports. On selecting, set the interval for sending reports.
Send warnings if no cab/rpl files have been received recently. Select the checkbox to send warnings. On selecting, define the interval at which the Replicator will check whether no files have been received.
When done, click Next to proceed with the installation steps.
Step 11
Verify and/or configure the settings to deliver the Replicator events to the monitoring server.
...
Connect to the monitoring server and send events. The option is recommended to be selected if your satellite or the main site has a stable internet connection. On selecting the option, you are required to set the monitoring server connection settings: server name or IP address, port, username and password:
After configuring the monitoring server settings, click. Test connection to make sure the connection is successfully established.Send heartbeat files to the main site. Set the option if you configure a satellite that has a poor internet connection.
Do not send events. Select the option to forbid monitoring the current site. If the option is selected on the main site, it also covers the sites sending their replication events to the server via the main site.
On completing, click Finish.
...
Now, follow the steps below:
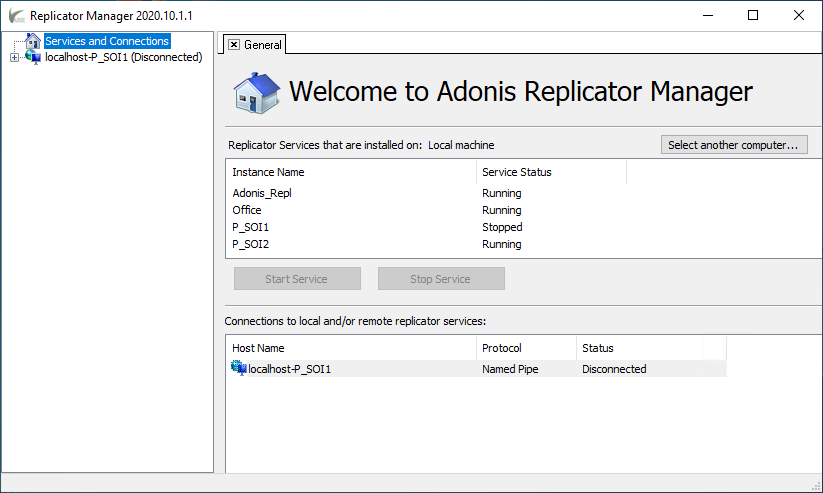
On the left-hand side pane, click Services and Connections to view the Welcome to Adonis Replicator Manager workspace.
Select the application instance (a default or a named instance) which services you have updated and click Start Service.
As a result, the service status changes to Running:
...
To set up the connection to a site, follow the steps below:
On the left-hand side of the application window, right-click Services and Connections. This opens a context menu:
...
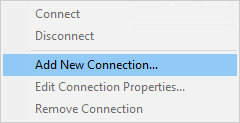
In the menu, select Add New Connection... Selecting the option opens the Connect to Replicator Service dialogue, which allows you to configure the connection and authentication properties:
...
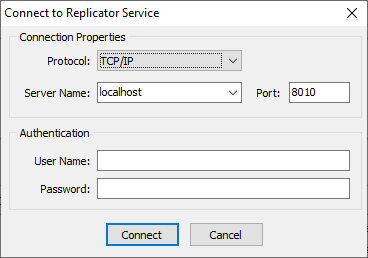
Protocol. In the drop-down list, select Named Pipe to establish the service's connection running on the same computer as Replicator Manager or TCP/IP to get connected to another computer.
Server Name (available only for the TCP/IP protocol). Specify the IP address of the computer to which you want to get connected to.
Port (available only for the TCP/IP protocol). Set a TCP port number: 8010.
Instance Name (available only for the Named Pipe protocol). Enter the name of the instance to which you want to get connected to.
Username. Enter the username you have defined on Step 9 while installing the application.
Password. Enter the password you have defined on Step 9 while installing the application.
Click Connect to continue.
Start Adonis Replicator Services
On adding the connections, you can now start the Adonis Replicator services. To do this, follow the step below:
On the left-hand side of the application window, click Services and Connections.
When the Welcome to Adonis Replicator Manager dialogue appears, select the Replicator instance which is to be started:

Click the Start Service button.
As a result, the instance status changes from Stopped to Running:
...
| Warning |
|---|
It is not recommended to start replication or set up a scheduler for automatic replication before finishing all the needed setup. |
Activate New Site
To create a new replication site, you have to perform its configuration in APM.
...
Now, make sure to be in the Site Properties tab, where you can get started by following the steps below:
Click the Add button on the ribbon. Clicking the button enables the fields to fill out:
Site Nr. Enter an ID number of the site.
It is not recommended to use the ID numbers the same as one of your active, ever deleted or passive sites.
Site Name. Set the name of the site.
Site Short Name. Enter a shortened name of the site.
E-mail. Enter an email address for each Replication site if the mail system is set to SMTP and POP3. Replicator uses the specified email addresses for sending an email to the SFTP server. Files are sent as attached files. In this case, you have to indicate the email address of a receiver site and a sender site (current site).
Active. Select the checkboxes for the sites involved in the replication. In case the checkbox is not set, the site assumes to be passive.
Current Site. Select the checkbox for the site you are currently working on.
Organization. From the drop-down list, select the vessel name if a new site is a vessel. In case the defined site is the main site, leave the field blank.
Is Purge. Select the checkbox to enable purging the database.
Click Save on the ribbon to proceed.
Add Communication Channels
...
| Tip |
|---|
On the main site, all the channels for all sites must be listed. For a satellite, only two channels are required. |
Follow the steps below:
Click the Add button on the ribbon. This enables the fields to be filled out:
Channel Nr. Enter a combination of numbers which consists of the site number of the host site and the site number of a new site.
For example, 10 – host site, 33 – our new site.The host site must have 2 channels for export and import with every active site. For example:
1033 - channel for export
Source Nr. From the drop-down list, select the site number for which you want to define the communication channel.
Source Name. The field contains the site name that is automatically fetched based on the selection in Source Nr.
Receiver Nr. From the drop-down list, select the site number to which the data is to be sent.
Receiver Name. The field contains the site name that is automatically fetched based on the selection in Receiver Nr.
Last File Nr. The field contains the number of the .cap file that has been recently used.
Last Export. The field contains the date and the exact time of the last .cap file export.
Last Import. The field contains the date and the exact time of the last .cap file import.
Active. Select the checkbox to make the channel active. If the checkbox is not selected, the channel is assumed to be passive.
Partial. Select the checkbox to enable the possibility to replicate limited data to ships (e.g., for each ship, its own number/set of people who have a historical, current or planned activity on this ship). For more information, seePartial Replication.
Click the Save button on the ribbon.
Add Channel Direction Types
...
On the working space, proceed as described below:
Click the Add button on the ribbon. This enables the fields to be filled out:
Channel Direction Type Nr. Enter the channel direction type number defined in the Direction Types.
Channel Direction Type Name. The field contains a direction type that is automatically fetched based on the defined Channel Direction Type Nr.
Channel. From the drop-down list, select the channel number among those defined in the Communication Channels tab.
Active. Select the checkbox to make the channel active. If the checkbox is not selected, the channel is assumed to be passive.
Click Save on the ribbon to proceed.
Add Connection to Satellites
...
| Info |
|---|
Before getting started, make sure the main site can access all the sites. In other words, the following points must be met:
All the connection details per site are available in the ReplManager.ini file. |
To add connections, follow the steps below:
Run Replicator Manager.
On the left-hand pane, right-click Services and Connections. This opens the menu:
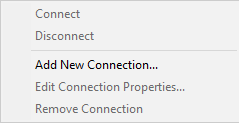
In the menu, select Add New Connection... The Connect to Replicator Service dialogue then appears:
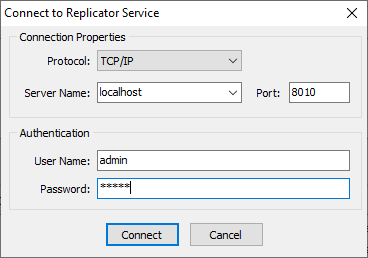
Within the dialogue, you can define the connection and authentication properties:
Protocol. Select TCP/IP to get connected to another computer.
Server Name. Enter the IP address of the computer to which you want to get connected to.
Port. Enter the port number required to connect to the server. Usually, the same port number is used for all connections inside one client and may be found in the ReplManager.ini file.
Username. Enter the username you have defined while installing the application. The username is available in the ReplManager.ini file.
Password. Enter the password you have defined while installing the application. The password is available in the ReplManager.ini file.
When done, click Connect.